Minecraft Help Desk is your site for help on all things Minecraft! To view various crafting recipes, click on the applicable tab at the top of the page! To view guides, go to the Guides tab. To view all posts that have been made, scroll down! Have a suggestion for a guide? Shoot us an email at bennington.sunday@gmail.com
How To Install A Basic Mod
The following guide will show you how to install a simple mod. Hope this helps! :)
1. First off, you want to have the Minecraft Launcher installed. You can install it by going to minecraft.net/download and click the Minecraft.exe link. (Windows) You will only have to download it once because it will update itself!
2. Run the Launcher after it has downloaded but do not click Login yet! Go to Options>Force Update>Done and THEN you login. After it finishes updating, close the launcher for now.

3. Download the mod of your choice. I will be using Marglyph's TooManyItems.
The mod should download as a zip folder.
4. You also need a file archiver program like 7-Zip
5. Once that is downloaded either hit the Windows key + R (Windows 7) or Search in the start menu Run. An window like the one below should appear. Enter exactly what is typed in the window in the picture below!

6. The 'Roaming' folder should come up with a lot of stuff in it. Near the top should be a folder called ".minecraft" Double click it then the folder inside of it called "bin"
7. Open up 7-Zip and navigate 7-Zip to the "bin" folder.
8. Find the Executable jar File called "minecraft.jar" not "minecraft-1.3.1" but just "minecraft.jar" and open it with a double click in 7-Zip.
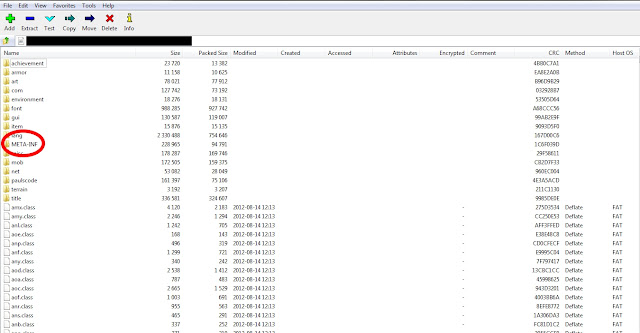
9. A window like the one below should appear. Look for a folder called 'META-INF' and delete it. DO NOT DELETE ANY OTHER FILES.

10. Open up the zip file that you downloaded the mod in and hit Extract Files. Make sure that "Show Extracted files when completed" is checked!
11. Once that finishes, make sure 7-Zip is open with the Windows Explorer window holding the mod files on top of it. Select all by pressing Ctrl + A and drag the files over to 7-Zip like shown below.

12. Minimize the Windows Explorer window so only 7-Zip is showing. A "Confirm File Copy" window should have appeared in 7-Zip. Click YES then close out of 7-Zip.
13. Run Minecraft Launcher again and test to see if your mod worked by going into a single player world! If you followed these steps correctly, it should have worked. If not, start again at step 1. If it continues to not work, make sure you are using the most recent version of the mod and that the mod is real.
Have any questions? Contact me! It is strongly recommended to
only have ONE MOD AT A TIME. Mods may require a mod called ModLoader which you
just put its files into 7-Zip as well.
Download this guide HERE!
How To Setup A Basic Bukkit Server (Windows)
Basic Bukkit Setup Tutorial for
Windows!
To do this click the third link from
the right “Get CraftBukkit”.
This should then take you to this next window, from
which we will be installing the latest craftbukkit snapshot. This page also
serves us as a way to start up our bukkit server according to your specific computer’s architecture.

If you aren’t sure how your computer is configured, this guide
will assist you in creating the right start up file. The line “-Xmx 1024M –Xms
1024M” is a call to allocate 2 GB of Ram to the server, since 1GB = 1024M. This
can be adjusted for more, however I recommend you leave ateast 1.5GB of RAM for
normal windows operations. The first statement is meant for
JRE6 users and the second is for
JRE7 users. For those who have a 64 Bit machine and Java in the “Program Files
(x86)” (Backwards compatible) you must modify the path from “%ProgramFiles%” to
“%ProgramFiles(x86)%”, this is determined in step three.
For those who are not sure, refer
back to this section after the next several steps, to create the perfect bukkit
start up harmony.

2. This section will show you how to locate important bits of information pertaining to how your computer is configured. First Click Start (or windows key) then open the Control Panel and search “Java” in the upper right hand corner.
 In the results you will want to
open the icon shown on the left. Then in the “General” tab click the “About”
button. This will tell us what version of Java you are using. Although this is VERY important, we
also need a bit more information to determine the correct path for the start up
file. Next we are going to determine if your version of Windows is 64 Bit or 32
Bit, also we will determine if your version of Java is backwards compatible (64
bit users only).
In the results you will want to
open the icon shown on the left. Then in the “General” tab click the “About”
button. This will tell us what version of Java you are using. Although this is VERY important, we
also need a bit more information to determine the correct path for the start up
file. Next we are going to determine if your version of Windows is 64 Bit or 32
Bit, also we will determine if your version of Java is backwards compatible (64
bit users only).
3. Again open Start, then go to
computer and click on your hard drive (If you have more than one, the Primary
Partition should be opened). If you do not see two “Program Files” folders skip
this step, you have a 32 Bit version of Windows. However if you have two, this
means you have a 64 Bit version of windows. Thus you must search in each folder
for “Java”. If you only find Java in the “Program Files (x86)” folder, you then
must modify the path as specified in step 1.

4. Using the information we have learned to create the PERFECT bukkit
starter for your computer. Copy the statement that fits your computer and open
Notepad.
Next save the document as
“StartUp.bat” and make sure to change save as type to “All Files”. It should be
saved in the same folder as the other craftbukkit material you previously
downloaded. Also be sure to rename the .jar
(currently is “craftbukkit-1.3.1-R1.0.jar”) file to “craftbukkit.jar” .
This is important for our start up
file, so it knows what it will boot up.

5. Finding your computer’s internal IP. Please note wireless devices
will occasionally shift internal IP, thus creating a failed to bind to port
error. If this happens simply repeat steps 5 and 6. To find your computer’s IP
first open the Start menu and search “cmd”. Click the “cmd.exe” option in the
results. Once the command prompt (cmd) window is open,
type “ipconfig” and press enter.

6. Using your Internal IP. After a few process are completed in the
command prompt window we are going to look for the IPv4 address. Now that you
have the IPv4, open the Server. Properties (One of the files downloaded as part
of the craftbukkit download. Open the file and enter your IPv4 next to the “server
ip:”, save and close.

7. Running your new Craftbukkit
Server and Closing Remarks. Finally, the light at the end of the tunnel! All
that is left to do is double click the “StartUp.bat” we made early.
After an
execution log, the final line should say “Done” proceeded by a timestamp, you
are now free to connect to your very own bukkit server.

This may be done on the
computer running the server by connection to “LocalHost” in minecraft
multiplayer or by other computers on your network by the IPv4 you entered as
your server IP. Although this server can currently not allow for connections
outside your local internet network. The future has almost unlimited
possibilities with bukkit’s modular design. The plugins folder will allow you
to create a unique minecraft experience for all who connect to your server.
Congrats and the best of luck! -TVFlash
Written by Our Bukkit Expert "TVFlash" Got questions? Email bennington.sunday@gmail.com and we will pass them onto him!
How To Set Up a Free Hamachi Server
How to Set Up a Minecraft
Multiplayer Server with a Free Hamachi Network

2.
Locate the section entitled “Multiplayer Server” and click the link shown in the picture below.
You will download a .exe that is 100% safe. Make sure you click run NOT save!

3.
Locate the Application, most likely in your
“Downloads” Library (Windows 7). It will be called “Minecraft_Server”. Before running it, I strongly suggest you make
a new empty folder that will solely be for the server. Once it is in the
folder, double-click it. A window like the one below should appear. Click run.


4.
After clicking
run, the server console will appear. Let it finish until it says something
along the lines of “[INFO] Done (9.412s)!
For help, type "help"


5.
You will also notice that in the Windows
Explorer program the folder you designated for the server has additional items.
I will go through only two of them.
6.
Double click the PROPERTIES FILE called “server” like the one shown below. A
window should open in your default text editor program, usually Notepad. For
now, let’s close the Server Console. You won’t need it until later.


7.
Open up LogMeIn Hamachi and Power it on. Go to
Network>Create a new network and enter a unique name and password you will
remember.

8.
Take notice of the IPv4 Address above
your computer’s name in the LogMeIn Hamachi window. Right-mouse click it and
hit “copy IPv4 address.” This is also going to be your server’s IP
address in the future that you will give out to your friends.
9.
Paste the IPv4 address into the area
shown below. The rest of the settings in the .txt file you can find out more at
http://www.minecraftwiki.net/wiki/Server.properties

10.
Close out of the .txt file and make sure to
SAVE! If you want to just run a random seed world, then do not go on to step
11. All you have to do is run the server
console, have LogMeIn Hamachi running, and the IPv4 address in the place shown
above!
And remember, the IPv4 address is what you
give out to your friends! They also must
be in the Hamachi network for them to have access to the server!
If
you want to learn how to make your server run a custom map, keep reading the
next few steps!
11.
This part is fairly simple! Once you have
downloaded the custom map, you will usually need to unzip it to find the world
file. It will often be titled the name of either the map or called “world”.
Snoop around until you find a file which has similar contents to the one shown
below!


12.
Go back to the folder with all your server items
in it and find the folder titled “world”. Open it and delete the contents. Make
sure the server console isn’t running when you do this. Go to the folder with
the custom map files in it and select all and move them to the “world” folder
in your main server folder.
13.
Re-open the server console and make sure there
are no errors when it re-generates the world you just fed it. It might take
some time so don’t worry if you see the percentages slowly increase! And there
you have it!
All you have to do is run the server
console, have LogMeIn Hamachi running, and the IPv4 address in the place shown
above! And remember, the IPv4 address is what you give out to your friends!
They also must be in the Hamachi
network for them to have access to the server!
Every Minecraft update, you must get a new
Minecraft_Server.exe file but the setup steps shouldn’t differ to far from what
you previously did!

Thank you for
reading. I hope I have been a help to you! Stuck? Need help with anything
related to this or to Minecraft? Shoot me an email at bennington.sunday@gmail.com!
or
Have XFire? Add me! "mrstupidworm"
If you need help
with something on this guide, tell me exactly what step you are on and explain
in detail what isn’t working!
Want to download this guide? Click HERE!
Want to download this guide? Click HERE!
What is redstone?

Redstone is Minecraft's wiring system. It can be used for simple things like have light switches or even making computers. It is mined from the redstone ore which can usually be found deep in caves, often around lava but not always. There are many components to redstone which can be crafted with these recipes.
Redstone cannot be placed on glass and is destroyed with water and lava.
Subscribe to:
Comments (Atom)